Tuesday, November 30, 2010

ODI and Twitter

--

Integrating with Twitter may or may not be a need for a organization.
In this post we will look at how to Tweet from ODI.

Twitter exposes API's to manipulate data.
Twitter also enforced OAuth authentication and recommends all client applications to use it.
How the OAuth works is described here and all the related terminology associated with OAuth can be found here.

If you have a Twitter Account , this is what you need to do..

1) Register a Twitter Application-

Sigin into http://dev.twitter.com/ and choose option 2 - Register an App

Make sure you choose Application Type - "Client" as shown below.


After registering , twitter will generate Consumer Key and Consumer Secret.


2) Registering Twitter Application from ODI -

Current version of Java (1.6) does not have inbuild libraries to support OAuth authentication. Either end users have to write there own java libraries to get around OAuth and integrate with twitter api's or use open source libraries like jTwitter , scribe , twitter4j , etc.

In this post, I will be using twitter4j api's (jar file) which can be downloaded from here.

I have created an ODI open tool (TwitterRegistrationODI) to register any twitter application for any twitter account. This will generate the Access Token and Token Secret required for integrating with twitter API's.

The open tool code can be downloaded from here. You need to compile, add your own icon or any free to use icon and create the JAR files. The code was developed using ODI11g.

Add the jar files to your agent path and client user path.

Add the Open tool to ODI using the menu option "ODI -> ADD/Remove Open Tools ..  "


Add the Open tool to a package to execute it.

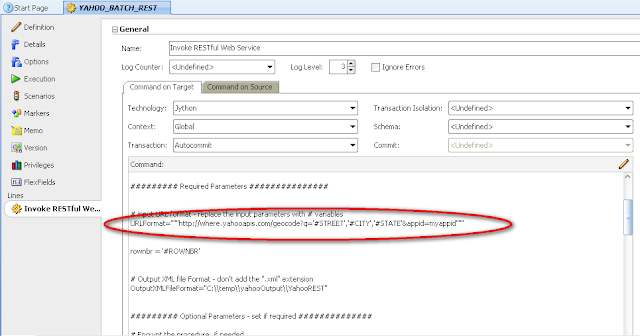
This open tool requires input - Consumer Key , Consumer Secret and Output token file (Access Token and Token Secret will be written to this file). There are other optional proxy parameters which can be set as per the environment.


Executing the step will pop up a window with URL to authorize the twitter application.


Copy the URL. Use any browser and grant the Twitter application access by logging with your twitter account.


This will generate a PINCODE which is needed to generate Access Token and Token Secret.


Goback to ODI and hit enter and this will popup another window. Enter the PINCODE.


Success Message is displayed , if access token and token secret are generated successfully.


The output file has the Access Token and Token Secret.


Note: This process of generating Access Token and Token Secret is needed only once. If the consumer key and consumer token are reset for a twitter application, then the new access token and token secret needs to regenerated.


3) Tweeting from ODI - 

Created another Open tool (TwitterODI). This open tool will be used to tweet from ODI.

The open tool can be downloaded from here. You need to compile, add your own icon or any free to use icon and create the JAR files. The code was developed using ODI11g.

Add the jar file to your agent path and client user path. Import the open tool.

Add it to a package, set the parameters and execute.


Execute the step/package. Signin into Twitter and here we have our message.


This Open tool can be modified further to do other things like getting new tweets , searching tweets , etc..but off course its limited to api's provided by twitter4j.
In my opinion its a complete library.


--

Sunday, November 28, 2010

OWB and Twitter

--

Integrating with Twitter may or may not be a need for a organization.
In this post we will look at  how to Tweet from OWB.
Tweeting using a simple TCL/JAVA script from OMB*Plus activity or a Java program using a JAVA activity in process flow. In short , tweets can be send from OMB*Plus prompt. Yes, it can be send. Well thats the fun part.

Twitter exposes API's to manipulate data.
Twitter also enforced OAuth authentication and recommends all client applications to use it.
How the OAuth works is described here and all the related terminology associated with OAuth can be found here.

If you have a Twitter Account , this is what you need to do..

1) Register a Twitter Application-

Signin into http://dev.twitter.com/ and choose option 2 - Register an App

Make sure you choose Application Type - "Client" as shown below.


After registering , twitter will generate Consumer Key and Consumer Secret.


2) Registering Twitter Application from OWB -

Current version of Java (1.6) does not have inbuild libraries to support OAuth authentication. Either end users have to write there own java libraries to get around OAuth and integrate with twitter api's or use open source libraries like jTwitter , scribe , twitter4j , etc.

In this post, I will be using twitter4j api's (twitter4j_latestversion.jar) which can be downloaded from here. Add the jar file to Oracle_Home/owb/lib/ext.

I have created an OWB expert , to register any twitter application for any twitter account. This will generate the Access Token and Token Secret required for integrating with twitter API's.

The expert can be downloaded from here.

Import the expert and you should see it under Global Navigator -> Public experts.


Execute the expert.

This will popup a window. Enter the cosumer key , cosumer secret and output file (to store the generated Access Token and Token Secret) and hit enter. There are other optional proxy parameters which can be set as per your environment, if needed.


This will popup another window with an authentication URL.


Copy the URL. Use any browser and grant the Twitter application access by logging with your twitter account.


This will generate a PINCODE which is needed to generate Access Token and Token Secret.


Goback to the executing Expert Window and Enter pincode and test mesaage (optional).


Success Message will be displayed on successful generation of access token and token secret.


The output file has the Access Token and Token Secret.


In this case , a test message was entered. Signing back into Twitter displays the message.


Note: This process of generating Access Token and Token Secret is needed only once. If the consumer key and consumer token are regenerated for twitter application, new access token and token secret needs to  be regenerated


3) Tweeting from Process flow -

In OWB11gR2 , external calls like executing a Java Class using Java Activity or TCL scripts using OMB*Plus activity can be performed within process flow.

In this post i will be demonstrating using OMB*Plus activity operator to execute a TCL/JAVA script to tweet messages.

You can also create a Java program and call it from Java activity in process flow.

A process flow with an OMB*Plus activity.


OMB*Plus Activity with variables defined and values set for all the variables - Consumer Key, Consumer Secret , Access Token , Token Secret , Message.


In the Script parameter , use the following code

package require java

# send tweets using twitter4j api's

# set the fields using processflow variables
# required fields 
set consumerKey ${CONSUMER_KEY} 
set consumerSecret ${CONSUMER_SECRET} 
set accessToken ${ACCESS_TOKEN} 
set accessTokenSecret ${TOKEN_SECRET} 
set msg ${MESSAGE} 

#optional fields 
set proxyHost "" 
# if not using proxyHost default the value of proxyPort to zero 
set proxyPort 0
set proxyUsername "" 
set proxyPassword ""  

java::import twitter4j.Status 
java::import twitter4j.Twitter 
java::import twitter4j.TwitterFactory 
java::import twitter4j.conf.ConfigurationBuilder  

set cb [ java::new ConfigurationBuilder ] 
$cb setOAuthConsumerKey $consumerKey  
$cb setOAuthConsumerSecret $consumerSecret 
$cb setOAuthAccessToken $accessToken 
$cb setOAuthAccessTokenSecret $accessTokenSecret  

if { $proxyHost != "" } {   
       $cb setHttpProxyHost $proxyHost   
       $cb setHttpProxyPort $proxyPort 
    } 

if { $proxyUsername != "" }  {   
      $cb setHttpProxyUser $proxyUsername   
      $cb setHttpProxyPassword $proxyPassword 
   }   

set tf [ java::new TwitterFactory [ $cb build ] ] 
set twitter [ $tf getInstance ] 
set status [ $twitter updateStatus $msg ]  


If you want to put some pretty icon (your own or some free icon ) it can be done using Icon Set and OMB command. Thank you David Allan for Icon Set use.

OMBALTER PROCESS_FLOW 'YOUR_PROCESSFLOW' MODIFY ACTIVITY 'YOUR_OMBACTIVITY' SET REF ICONSET 'YOUR_ICONS'


Script can be modified further to do other things like getting new tweets , searching tweets , etc..but off course its limited to api's provided by twitter4j.
In my opinion its a complete library.


Now the fun part.

Tweeting from OMB*Plus prompt -

Use the script below and save it to some file say OWBTweet.tcl

# Send Tweets from OMBPlus using twitter4j api's
#
# Usage:
#   OMBCC '/YOUR_PROJECT'
#   source 
#   Example:
#   source "c:\\temp\\OWBTweet.tcl"
#
#   Syntax:
#   OMBTWEET  MSG
#   Example
#   OMBTWEET "HELLO TWITTER"
#
#   Set the ConumerKey , ConsumerSecret , TokenAccess and Token Secret in the code below.
#   Proxy Host , Proxy Port , Proxy Username and Proxy Password are optional
#
#
#
#
proc OMBTWEET {message} {

# required fields - set it with your values
set consumerKey yourconsumerkeyvalue
set consumerSecret yourconsumersecretvalue
set accessToken youraccesstokenvalue
set accessTokenSecret youraccesstokensecretvalue

#optional fields
set proxyHost ""
# if not using proxyHost default the value of proxyPort to zero
set proxyPort 0
set proxyUsername ""
set proxyPassword ""

java::import twitter4j.Status
java::import twitter4j.Twitter
java::import twitter4j.TwitterFactory
java::import twitter4j.conf.ConfigurationBuilder

set cb [ java::new ConfigurationBuilder ]
$cb setOAuthConsumerKey $consumerKey 
$cb setOAuthConsumerSecret $consumerSecret
$cb setOAuthAccessToken $accessToken
$cb setOAuthAccessTokenSecret $accessTokenSecret

if { $proxyHost != "" } { 
  $cb setHttpProxyHost $proxyHost
  $cb setHttpProxyPort $proxyPort
}

if { $proxyUsername != "" } { 
  $cb setHttpProxyUser $proxyUsername
  $cb setHttpProxyPassword $proxyPassword
}

set tf [ java::new TwitterFactory [ $cb build ] ]
set twitter [ $tf getInstance ]
set msg $message
set status [ $twitter updateStatus $msg ]
puts "Message Tweeted Successfully."
}


Change it as per your environment. Source the script and execute the command.


If you want to source the srcipt as command its worth looking at Oleg's blogpost over here.

--

PDF Data Extraction - ODI

--

In this post we will look at how to extract data from PDF documents using ODI.

This post will concentrate on extracting data from PDF form fields (FF).

For demo , I will be using W-4 PDF form.


There are few challenges - 

1) To extract metadata or data from PDF documents we need a set of Java api's which can handle PDF's internal format to extract metadata and data.

Solution - There are tons of open source PDF Libraries in Java which can help us easily overcome this issue. List of Open Source PDF Libraries in Java can be found here.

This post uses iText. For using iText, download the latest jar file from here.
To make it accessible , add the jar file to your path ..\odi\oracledi\userlib either under your user or the agent you are using.


2) Represent PDF as a flat file and then form fields can be treated as columns. This will provide the flexibility to choose form fields of our choice.

Solution - Created an LKM (Load Knowledge Module) which will process all the PDF files in an directory and help us extra data from FF of our choice.
It can extract from different PDF datatypes like text fields, checkboxes ,radio buttons,etc.

So here are few simple steps to extract data form PDF files and load it into a database table.


Extracting Metadata to represent PDF document as a flat file:

The following ODI procedure extracts metadata and data from a single PDF file and writes it to an output file.

import os, sys
from com.itextpdf.text.pdf import PdfReader

# change the input variables as per your requirement
OutputFile="c:\\temp\\pdfs\\PDFMetaData.txt"
pdfFile="c:\\temp\\pdfs\\w4_1.pdf"
delimiter="|"
generateFieldNames="Y"
generateInternalFieldNames="Y"
generateFieldValues="Y"
columnNameFormat="COLUMN_"

##############################
###### start of main #########
##############################
pos=0
reader = PdfReader(pdfFile)

# calling iText api's to get formfields and formvalues
for ffname in reader.getAcroForm().getFields():
    ffvalue = str(reader.getAcroFields().getField(ffname.getName()))
    pos = pos+1
    if pos == 1:
       if generateFieldNames == "Y":
          colNames = columnNameFormat + str(pos) 
       if generateFieldValues == "Y":
          colValues =  ffvalue 
       if generateInternalFieldNames == "Y":
          internalNames =  ffname.getName()
    else:
       if generateFieldNames == "Y":
          colNames = colNames +  delimiter + columnNameFormat + str(pos)
       if generateFieldValues == "Y":
          colValues = colValues +  delimiter +  ffvalue  
       if generateInternalFieldNames == "Y":
          internalNames = internalNames + delimiter + ffname.getName()


filehandle= open(OutputFile,'w')
if generateFieldNames == "Y":
    filehandle.write(colNames + '\n')
if generateInternalFieldNames == "Y":
    filehandle.write( internalNames + '\n')
if generateFieldValues == "Y":
    filehandle.write(colValues + '\n')
filehandle.close()

reader.close()


The output file -

The output file generates three lines.


First Line - Dummy Column names with position prefix attached like COLUMN_1,COLUMN_2,COLUMN_3,etc

Second Line - Data f1_01(0) , f1_02(0),etc
These are internal representation of the form fields within the PDF file.
They are not meaningful and can have special characters. These can very difficult to represent it in ODI.

Third Line - It's the data within the form fields.

We will be using the first line as our column names to represent the PDF file.


Importing the file -


Changing column names to some meaningful names -


Note: It is important to have the position prefix , since we are not using internal representation of the PDF form field name as it can have special characters.


LKM which does its own magic -


LKM consists of few JDBC calls to drop and create the work tables. The important task of extracting the values from FF and inserting data into the work tables is done via Jython Task (Jython Code).

Jython task uses Java api's to extract values. All the other metadata regarding which columns to extract are feed via ODI substitution method. This task also generates a bad file(error information) for every unprocessed pdf.

The LKM can be downloaded from here.

Note: LKM above works with old iText API library.  David Allan has uploaded the modified code which works latest iText API library and can be downloaded from here.

Interface to load data from PDF files to a table -


Applying the LKM to the Interface -


The Input PDF files -


Output after execution of Interface -


Extracting text and Parsing it from PDF's is also possible using TextStripper option availabe with Java API's.

The above example is one of the many alternatives available to extract data from PDF.

--

Sunday, November 7, 2010

Invoking RESTful WebServices - ODI11g

--

Web services can be accessed via HTTP and so they can be invoked\consumed using HTTP GET/POST methods.

With ODI there are different options like creating a customized Open tool or Knowledge Module to implement this. In this post, will be demonstrating how to invoke a RESTful webservice and write the response XML to a file using an ODI Procedure.

Will be using Yahoo's Place finder geocoding webservice as an example to pass street address to get additional information like latitude,longitude,county,etc.


Using the Yahoo's geocoding webservice -

To use geocoding webservice you need an Applicaion_Id (appid) key from yahoo, you can generate it from here(There is no charge to it).

The format to invoke the webserivce in this case is http://where.yahooapis.com/geocode?q=STATE,CITY,STATE&appid=[yourappidhere]

If you hit the URL below on any browser you should see the XML (that's one of the beauty of REST )
http://where.yahooapis.com/geocode?q=1600+Pennsylvania+Avenue,+Washington,+DC&appid=[yourappidhere]


ODI procedure to Invoke a single RESTful web service:

A simple ODI procedure which uses Jython to invoke and consume web service. This procedure has many input parameter.These parameters can be set either using Variables or OPTIONS.

Required Parameter -
1) URLFormat - URL of the webservice to be invoked.

In this case the value is

URLFormat="http://where.yahooapis.com/geocode?q='#STREET','#CITY','#STATE'&appid=myappid"

Note: STREET,CITY,STATE are the ODI variables.
         myappid is the application key provided by yahoo

2) OutputXMLFile="C:\\temp\\yahooREST.xml"

Optional Parameters -
There are other optional parameters which you can set if needed

PROXY_HOST - proxy host name
PROXY_PORT - proxy port number
and others

ODI Procedure Code -

import java.io.BufferedReader as BR
import java.io.InputStreamReader as ISR
import java.net.HttpURLConnection as uc
import java.net.URL as URL
import java.net.Proxy as Proxy
import java.net.InetSocketAddress as ISA
import base64
import string

#### Set the parameters below - Use Variables or Options

########### Required Parameters #######################

URLFormat="http://where.yahooapis.com/geocode?q='#STREET','#CITY','#STATE'&appid=myappid"

OutputXMLFile="C:\\temp\\yahooREST.xml"

######### Optional Parameters - set if required ##############

# Encrypt the procedure, if needed 

# if you are setting the Proxy_Host , set the Proxy_Port too
Proxy_Host=""
# Proxy Port  - If not using Proxy, default value should be 0
Proxy_Port=0

## Use Either Proxy_Username and Proxy_Password OR Proxy_UserPass_Encoded
Proxy_Username = ""
Proxy_Password = ""
Proxy_UserPass_Encoded=""

## Use Either Webservice_Username and Webservice_Password OR Webservice_UserPass_Encoded
Webservice_Username = ""
Webservice_Password = ""
Webservice_UserPass_Encoded=""


#####################################
####### Code starts here   ##########
#####################################

## Encode the username password for basic authentication

if Webservice_UserPass_Encoded == "":
   Webservice_Authorization = 'Basic ' + string.strip(base64.encodestring(Webservice_Username + ':'  +  Webservice_Password))
else:   
   Webservice_Authorization = 'Basic ' + Webservice_UserPass_Encoded
   
if Proxy_UserPass_Encoded == "":
   Proxy_Authorization = 'Basic ' + string.strip(base64.encodestring(Proxy_Username + ':' + Proxy_Password))
else:
   Proxy_Authorization = 'Basic ' + Proxy_UserPass_Encoded

inURL=URLFormat.replace(' ','%20')

if Proxy_Host == "": 
   url = URL(inURL)
   uc =  url.openConnection()
else:
   isa = ISA(Proxy_Host,Proxy_Port)
   proxy = Proxy(Proxy.Type.HTTP, isa)
   url = URL(inURL)
   uc =  url.openConnection(proxy)   
uc.setRequestMethod("GET")
uc.setRequestProperty("Authorization",Webservice_Authorization) 
uc.setRequestProperty("Proxy-Authorization",Proxy_Authorization)
uc.connect()
responseCode=uc.getResponseCode()
responseMessage=uc.getResponseMessage()

if responseCode ==  200 and responseMessage == "OK":
   br=BR(ISR(uc.getInputStream()))
   outRESTXML = ""                           
   outline = br.readLine()
   while (outline != None):  
          outRESTXML += outline + "\n" 
          outline = br.readLine() 
   XMLfilehandle= open(OutputXMLFile,'w')
   XMLfilehandle.write(outRESTXML)
   XMLfilehandle.close()
else:
   uc.disconnect()
   raise  'HTTP Error - Response Code:' + str(responseCode) + ' and Response Message: ' + responseMessage + '\n'

uc.disconnect()

To run it for every row , design a package to loop through all rows , populate variables and run the procedure and parse the XML using XML adapter.

Note: This code can also be used as a workaround for Jython URLLIB2 issue.


ODI procedure to Invoke a RESTful web service for all the rows in a query:

In some cases , the XML returned also contains information about the parameters that were used to invoke the webserivce. In such a case you can customize the code to invoke webservice and generate XML file for every row. This help save lot of work and time.

Note: This scenario is not suitable in the above case as the returned XML does not contain the street,city,state. Code can be changed to insert the XML into a table also.


Command on Source:


Command on Target:


The entire code:

import java.io.BufferedReader as BR
import java.io.InputStreamReader as ISR
import java.net.HttpURLConnection as uc
import java.net.URL as URL
import java.net.Proxy as Proxy
import java.net.InetSocketAddress as ISA
import java.text.SimpleDateFormat as SDF
import java.util.Date as date
import base64,string


## Set the parameters below - Use Variables or Options

######### Required Parameters ###############


# input URL format - replace the input parameters with # variables
URLFormat="""http://where.yahooapis.com/geocode?q='#STREET','#CITY','#STATE'&appid=myappid"""

# rownum as part of filename to generate distinct filenames
rownbr = '#ROWNBR'


# Output XML file Format - don't add the ".xml" extension
OutputXMLFileFormat="C:\\temp\\yahooOutput\\YahooREST"


######### Optional Parameters - set if required ##############

# Encrypt the procedure, if needed 

# if you are setting the Proxy_Host , set the Proxy_Port too
Proxy_Host=""
# Proxy Port  - If not using Proxy, default value should be 0
Proxy_Port=0

## Use Either Proxy_Username and Proxy_Password OR Proxy_UserPass_Encoded
Proxy_Username = ""
Proxy_Password = ""
Proxy_UserPass_Encoded=""

## Use Either Webservice_Username and Webservice_Password OR Webservice_UserPass_Encoded
Webservice_Username = ""
Webservice_Password = ""
Webservice_UserPass_Encoded=""

# the date/datetime format will be appended to the xml file (needs to be Java Compatible)
xmlFileNameDateAppend = "yyyy-MM-dd"


############################################
###  Main Starts here                  #####
############################################
         
def getRESTXML(inURLData):
# setup and call the webservice
    responseCode=0
    responseMessage=""
    errorMessage=''
    outRESTXML = ""                           
    if Proxy_Host == "":
       url = URL(inURLData)
       uc =  url.openConnection()
    else:
       isa = ISA(Proxy_Host,Proxy_Port)
       proxy = Proxy(Proxy.Type.HTTP, isa)
       url = URL(inURLData)
       uc =  url.openConnection(proxy)   
    uc.setRequestMethod("GET")
    uc.setRequestProperty("Authorization",Webservice_Authorization)
    uc.setRequestProperty("Proxy-Authorization",Proxy_Authorization)
    uc.connect()
    responseCode=uc.getResponseCode()
    responseMessage=uc.getResponseMessage()      
    if responseCode ==  200 and responseMessage == "OK":
       br=BR(ISR(uc.getInputStream()))
       outline = br.readLine() 
       while (outline != None):  
            outRESTXML += outline + "\n" 
            outline = br.readLine() 
       uc.disconnect()
    else:
       errorMessage = 'Error - Response Code:' + str(responseCode) + ' and Response Message: ' + responseMessage + '\n'
    return outRESTXML,errorMessage

### Start of Main

## Encode the username password for basic authentication
if Webservice_UserPass_Encoded == "":
   Webservice_Authorization = 'Basic ' + string.strip(base64.encodestring(Webservice_Username + ':'  +  Webservice_Password))
else:   
   Webservice_Authorization = 'Basic ' + Webservice_UserPass_Encoded
   
if Proxy_UserPass_Encoded == "":
   Proxy_Authorization = 'Basic ' + string.strip(base64.encodestring(Proxy_Username + ':' + Proxy_Password))
else:
   Proxy_Authorization = 'Basic ' + Proxy_UserPass_Encoded

inDateFormat = SDF(xmlFileNameDateAppend)
inDate=inDateFormat.format(date())

if xmlFileNameDateAppend == "":
    outXMLFile = OutputXMLFileFormat + '_ '+ str(rownbr)  +  '.xml'
else:
    outXMLFile = OutputXMLFileFormat + '_ ' + str(rownbr)  + '_' +  inDate + '.xml'


inURLData = URLFormat.replace(' ','%20')
retRESTXML,errorMessage=getRESTXML(inURLData)
if errorMessage <> "":
    raise errorMessage
else:
    xmlFileHandle=open(outXMLFile,'w')
    xmlFileHandle.write(retRESTXML)
    xmlFileHandle.close()


Output -


RESTful webservices can also return data in different format like CSV,TEXT,JSON etc.
They can also manipulate data using HTTP POST\DELETE methods.
Code can be easily customized to handle any condition.